
There’s a moment every new sewer knows well. You’ve got the fabric. You’ve got the thread. You sit down at your machine, excited to finally make something with your hands and then you stare at the spool, the guides, the bobbin, and the needle, and your mind goes completely blank.
I’ve been there. My grandmother handed me her old Singer when I was in my twenties, and the first thirty minutes were less about sewing and more about frustration. The thread kept snapping, stitches were skipping, and I had no idea why. Turns out, I hadn’t threaded it correctly not even close.
That moment pushed me to truly learn how to thread a sewing machine, and now it takes me under two minutes from cold start to first stitch. This guide gives you everything I wish I’d had that day, laid out clearly so you can go from confused to confident in a single read.
And you’re not alone in picking up this skill. According to the Craft and Hobby Association, 63% of survey respondents engage in sewing as a hobby, and the global sewing machine market was valued at $6.8 billion in 2023, projected to reach $10.3 billion by 2032 (IMARC Group). People everywhere are discovering or rediscovering the joy of fabric and thread.
Why Learning to Thread a Sewing Machine Matters
Before we get into the steps, let’s address something beginners often overlook: most sewing problems trace back to threading errors, not broken machines or bad fabric.
When you know how to thread a sewing machine properly, you prevent:
- Skipped stitches caused by upper thread not seated in tension discs
- Thread breakage mid-seam from wrong threading path or too-tight tension
- Bobbin thread bunching under the fabric from lower thread not pulled correctly
- Needle unthreading repeatedly from thread inserted on the wrong side
Getting this right once means smoother, faster sewing every single session after. It is the foundation everything else is built on.
What You Need Before You Start
Learning how to thread a sewing machine starts before you touch the first guide. Gather these essentials:
- Your sewing machine with the manual nearby for reference
- A spool of thread appropriate for your project
- An empty or pre-wound bobbin that fits your specific machine
- A sewing needle installed in the machine appropriate for your fabric
- Good lighting because threading the needle eye requires it
One pro tip learned early: always raise the presser foot lever before threading the upper thread. This releases the tension discs and lets the thread seat properly between them. Skip this step and your tension will be off from the start.
Part One: How to Wind and Insert the Bobbin
Most guides jump straight to the upper thread, but the bobbin comes first. Here is how to thread a sewing machine from the ground up, starting at the bottom.
Step 1: Wind the Bobbin with Thread
Place your spool of thread on the spool pin at the top of the machine. Pull the thread across and wrap it around the bobbin winding tension disc, usually a small disc near the top left of the machine. Place your empty bobbin on the bobbin winder pin, typically top right, and hook the thread through the small hole in the side of the bobbin.
Slide the bobbin winder pin to the right to engage the winder, then press the foot pedal. The machine will wind thread onto the bobbin automatically. Most machines stop automatically when the bobbin is full. Slide the pin back to the left when done and trim the thread.
Step 2: Insert the Bobbin into the Machine
This varies by machine type. Most modern machines use either a top-load drop-in bobbin or a front-load bobbin with a case.
For top-load drop-in machines:
- Remove the slide cover plate on the throat plate area
- Drop the bobbin in so the thread unwinds counter-clockwise as your machine diagram indicates
- Pull the thread through the slot and under the tension spring, leaving a 6-inch tail
For front-load bobbin case machines:
- Open the front access panel or lower left compartment
- Insert the bobbin into the case so thread unwinds in the correct direction
- Thread through the slot in the case, under the tension spring, and through the small notch until you feel a slight click
- Insert the case into the machine hook until it snaps into place
Always check your machine manual for the exact diagram. Threading the bobbin incorrectly is one of the most common reasons stitches form poorly underneath your fabric.
Part Two: Threading the Upper Thread Path
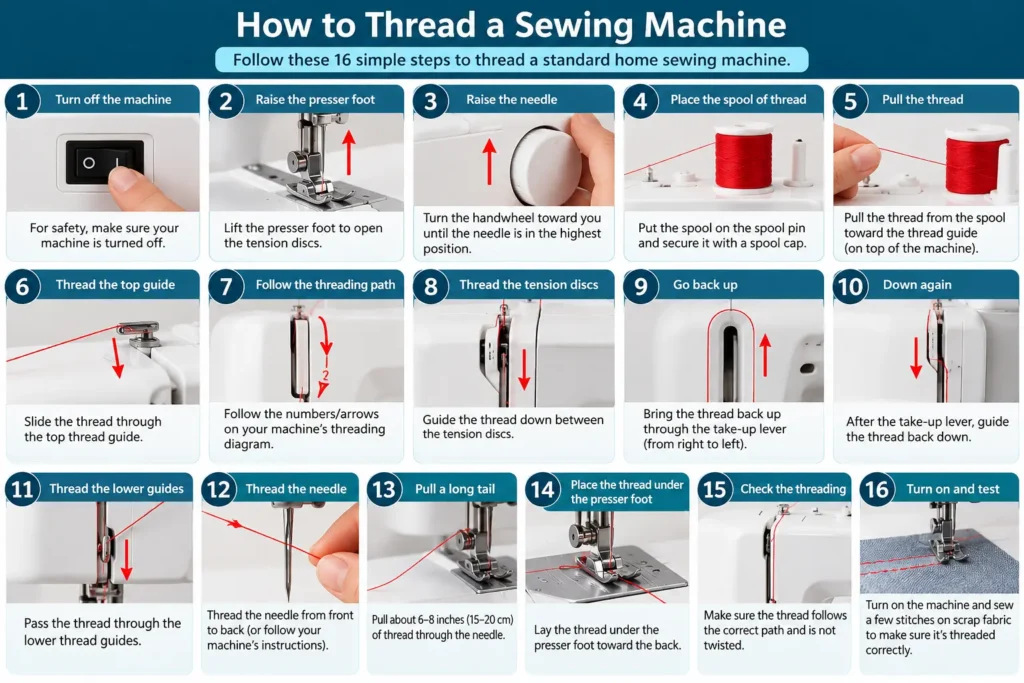
Now for the part most people think of when they hear how to thread a sewing machine: the upper thread. Every machine has numbered guides or arrows to follow, but the sequence is nearly universal.
Step 3: Place the Thread Spool
Set your thread spool on the spool pin at the top of the machine. Depending on your machine, the spool pin sits horizontally or vertically. If horizontal, add the spool cap to keep the thread from unwinding too fast. If vertical, make sure the thread unwinds from the back of the spool counter-clockwise as you look at it from above.
Step 4: Guide Through the Upper Thread Guide
Pull the thread to the left and through the upper thread guide, usually a metal hook or slot near the top left of the machine. This anchors the thread before it travels down into the tension system.
Step 5: Thread Through the Tension Discs
Pull the thread straight down through the right channel following the groove or arrow printed on your machine, around the bottom U-bend, and back up the left channel. The thread passes between the tension discs during this U-path, which is what controls stitch quality. This is the most critical part of how to thread a sewing machine and the step most commonly done wrong.
Step 6: Hook the Take-Up Lever
As you pull the thread up from the tension area, hook it through the take-up lever, the moving hook that pokes through a slot on the front of the machine and moves up and down when you sew. Always thread from right to left through this lever.
The take-up lever controls how much thread is fed to the needle with each stitch. Missing this step causes thread pile-up and skipped stitches.
Step 7: Thread the Needle Bar Guide and Needle
Pull the thread back down toward the needle. Pass it through the small thread guide just above the needle, which is the needle bar guide, then thread the eye of the needle from front to back on most standard machines. Some Brother and Janome models thread side-to-side, so check your manual.
Pull about 6 inches of thread through the needle eye and lay it toward the back of the machine.
Part Three: Bringing Up the Bobbin Thread
You have threaded the top. The bobbin is loaded. Now connect them, which is the final step in how to thread a sewing machine completely.
Step 8: Draw Up the Bobbin Thread
Hold the upper thread loosely in your left hand. With your right hand, turn the handwheel toward you one full rotation. As the needle dips down and comes back up, it catches the bobbin thread and pulls a loop of it up through the needle plate.
Reach in and pull that loop with a pin or your finger, drawing the bobbin thread tail up to the surface. You should now have two threads, upper and lower, coming from the needle area.
Pull both threads together toward the back of the machine, under the presser foot, and you are done. That is the complete picture of how to thread a sewing machine from start to finish.
Threading Guide at a Glance
| Step | Action | Common Mistake |
|---|---|---|
| 1 | Wind the bobbin | Winding too fast, uneven thread |
| 2 | Insert the bobbin | Wrong direction of thread unwind |
| 3 | Place the spool | Spool unwinds the wrong direction |
| 4 | Upper thread guide | Skipping this guide entirely |
| 5 | Tension discs U-path | Not seating thread between discs |
| 6 | Take-up lever | Missing this hook, most common error |
| 7 | Needle bar guide and needle eye | Threading back to front |
| 8 | Bring up bobbin thread | Not turning handwheel far enough |
Threading Tips for Popular Machine Brands
Understanding how to thread a sewing machine also means knowing that brand-specific differences exist. The core path is the same, but the layout shifts.
| Brand | Bobbin Type | Threading Direction | Notable Feature |
|---|---|---|---|
| Singer | Top-load or front-load | Follow numbered guides | Auto needle threader on newer models |
| Brother | Top-load drop-in | Counter-clockwise bobbin | Color-coded threading path |
| Janome | Top-load drop-in | Follow arrow labels | Numbered upper thread path |
| Bernina | Front-load case | Clockwise bobbin insert | Hook and latch bobbin case |
| Juki | Top-load drop-in | Counter-clockwise | Industrial-style tension system |
No matter the brand, the fundamentals of how to thread a sewing machine remain consistent. Follow the arrows, check the manual for direction-specific details, and you will be set up right every time.
How to Thread a Sewing Machine Without the Manual
What happens when you inherit an old machine with no documentation? Here is the approach that works every time:
- Look for numbers or arrows stamped directly on the machine. Most machines from the 1970s onward have them molded into the housing.
- Search the model number online. The model number is usually on a plate on the bottom or back of the machine. A quick search of brand name plus model number plus threading diagram almost always surfaces a PDF manual.
- Follow the universal path: spool pin, upper guide, down right channel, around U-bend, up left channel, take-up lever, needle bar guide, needle eye. This works on roughly 90% of home sewing machines.
- Test with a slow stitch. After threading, run a few stitches on scrap fabric at low speed. If the top and bottom stitches look balanced, you threaded it correctly.
Troubleshooting: When Threading Goes Wrong
Even when you know how to thread a sewing machine, you will occasionally hit a snag. Here is how to diagnose the most common issues:
Thread Keeps Breaking
Check that the thread is fully seated in the tension disc U-path. Also confirm you are using the right needle for your thread weight. A heavy thread through a fine needle snaps easily.
Stitches Forming Loops on the Underside
This is almost always an upper threading error, despite looking like a bobbin problem. Rethread the entire upper path from scratch, making sure the presser foot is raised before threading.
Needle Will Not Stay Threaded
You may be threading from back to front instead of front to back. Also ensure the needle is fully pushed up into the clamp. A needle seated too low will not catch the bobbin thread.
Fabric Bunching at the Start of a Seam
Hold both thread tails, upper and bobbin, toward the back of the machine as you begin the first few stitches. This prevents the machine from pulling them down into the feed dogs.
If you are also working on a home renovation and need sewing project ideas for your space, the team at Homes Remodeler has fantastic inspiration for handmade home decor that pairs perfectly with your newfound threading skills.
How Often Should You Rethread Your Machine?
This is a question beginners rarely think to ask. The honest answer: rethread more often than you think.
Best practice is to rethread your machine fresh at the start of every sewing session. Thread can settle incorrectly, shift out of guides, or pick up dust and lint that affects tension. If you have been sewing for a while and notice stitch quality declining, a full rethread, top and bottom, is the quickest fix.
Also rethread anytime you:
- Change thread color or weight
- Change the needle
- Move or transport the machine
- Notice skipped stitches, tension issues, or thread breakage
The American Sewing Guild, which has over 100,000 active members across the US, consistently notes that proper machine maintenance and correct threading are the top two factors in consistent stitch quality. You can find additional expert guidance directly from the manufacturer of your specific machine model.
FAQ: How to Thread a Sewing Machine
Q1: What is the correct order to thread a sewing machine?
Wind and insert the bobbin first, then thread the upper path: spool pin, upper thread guide, down the right tension channel, around the U-bend, up the left channel, through the take-up lever, down through the needle bar guide, and through the needle eye. Finally, use the handwheel to draw the bobbin thread up to the surface.
Q2: Why does my thread keep coming out of the needle?
The most likely causes are threading from the wrong direction, not leaving enough thread tail through the needle eye, or starting to sew without holding both thread tails toward the back of the machine. Aim for 5 to 6 inches of tail through the needle eye.
Q3: Can I thread a sewing machine without a manual?
Yes. Look for numbered guides or arrows on the machine housing, search the model number online for a PDF manual, or follow the universal path: spool to upper guide, down and around the tension U-path, through the take-up lever, and down to the needle. This works on the vast majority of home machines.
Q4: Does it matter which way the bobbin thread unwinds?
Absolutely. Most machines specify counter-clockwise unwinding for the bobbin when viewed from above on top-load machines, or a specific direction for front-load cases. Threading the bobbin backward creates tension problems and causes the lower thread to bunch or break.
Q5: How do I know if I have threaded my sewing machine correctly?
Test on a scrap piece of fabric. If the stitches on both sides look even and balanced with no loops on either face, your threading is correct. If you see loops on the top, the bobbin tension is off. If you see loops on the bottom, the upper threading is the issue, so when did you last take the time to rethread your machine completely from scratch?


